lightquant.com


  • 首页

  • 标签

  • 分类

  • 归档

  • 关于

  • 搜索

python基本语法

发表于 2018-03-13 | 分类于 python

基础语法

1. 注释

  • 单行注释:#号
  • 多行注释:'''和"""

2. 行与缩进

使用缩进来表示代码块,不需要使用大括号{}。同一个代码块的语句必须包含相同的缩进空格数

3. 多行语句

1
2
3
4
5
6
7
# 使用反斜杠(\)来实现多行语句
total = item_one + \
item_two + \
item_three
# 在 [], {}, 或 () 中的多行语句,不需要使用反斜杠(\)
total = ['item_one', 'item_two', 'item_three',
'item_four', 'item_five']

4. 数字(Number)类型
python中数字有四种类型:整数、长整数、浮点数和复数。

  • int (整数), 如 1, 只有一种整数类型 int,表示为长整型,没有 python2 中的 Long。
  • bool (布尔),如 true。
  • float (浮点数), 如 1.23、3E-2
  • complex (复数), 如 1 + 2j、 1.1 + 2.2j

5. 字符串(String)

1
2
3
4
5
6
7
8
9
10
11
12
13
14
15
16
17
18
19
20
21
22
23
24
25
# python中单引号和双引号使用完全相同。
word = '字符串'
sentence = "这是一个句子。"

# 使用三引号('''或""")可以指定一个多行字符串。
paragraph = """这是一个段落,
可以由多行组成"""

str='Runoob'

print(str) # 输出字符串
print(str[0:-1]) # 输出第一个到倒数第二个的所有字符
print(str[0]) # 输出字符串第一个字符
print(str[2:5]) # 输出从第三个开始到第五个的字符
print(str[2:]) # 输出从第三个开始的后的所有字符
print(str * 2) # 输出字符串两次
print(str + '你好') # 连接字符串

print('------------------------------')

print('hello\nrunoob') # 使用反斜杠(\)+n转义特殊字符
print(r'hello\nrunoob') # 在字符串前面添加一个 r,表示原始字符串,不会发生转义

a = 'd' in 'bca'
print(a) # 返回False

6. 等待用户输入
input("\n\n按下 enter 键后退出。")
7. Print 输出

1
2
3
4
5
6
y="b"
# 换行输出
print( y )
print('---------')
# 不换行输出
print( y, end=" " )

8. import 与 from…import

1
2
3
4
将整个模块(somemodule)导入,格式为: import somemodule
从某个模块中导入某个函数,格式为: from somemodule import somefunction
从某个模块中导入多个函数,格式为: from somemodule import firstfunc, secondfunc, thirdfunc
将某个模块中的全部函数导入,格式为: from somemodule import *

基本数据类型

1. 多个变量赋值

a,b,c = 1 ,3, 'sdf'

2. 标准数据类型

  • Number(数字)
  • String(字符串)
  • List(列表)
  • Tuple(元组)
  • Sets(集合)
  • Dictionary(字典)

    type() 函数和isinstance()可以用来查询变量所指的对象类型

    1
    2
    3
    4
    a = 1
    # 返回 <class 'int'>
    isinstance(a, int)
    # 返回 True

    两者区别:

    • type()不会认为子类是一种父类类型。
    • isinstance()会认为子类是一种父类类型。

      注意:在 Python2 中是没有布尔型的,它用数字 0 表示 False,用 1 表示 True。到 Python3 中,把 True 和 False 定义成关键字了,但它们的值还是 1 和 0,它们可以和数字相加。

3. del语句
del语句删除单个或多个对象
del a
4. 次方计算
用**表示
2 ** 3返回8
5. List(列表)
list = [ 'abcd', 786 , 2.23, 'lightquant', 70.2 ]

与Python字符串不一样的是,列表中的元素是可以改变的。list[0] = a

6. Tuple(元组)
tuple = ( 'abcd', 786 , 2.23, 'lightquant', 70.2 )

元组(tuple)与列表类似,不同之处在于元组的元素不能修改。

7. Set(集合)
集合(set)是一个无序不重复元素的序列。
基本功能是进行成员关系测试和删除重复元素。
可以使用大括号 { } 或者 set() 函数创建集合,注意:创建一个空集合必须用 set() 而不是 { },因为 { } 是用来创建一个空字典。

1
2
3
4
5
6
7
8
9
10
11
student = {'Tom', 'Jim', 'Mary', 'Tom', 'Jack', 'Rose'}
student2 = set('asd')
# set可以进行集合运算
a = set('abracadabra')
b = set('alacazam')

print(a)
print(a - b) # a和b的差集
print(a | b) # a和b的并集
print(a & b) # a和b的交集
print(a ^ b) # a和b中不同时存在的元素

8. Dictionary(字典)
类似与java的map

  • keys()输出所有的key
  • values()输入所有的值
1
2
3
4
5
6
7
8
9
10
11
dict = {}
dict['one'] = "1 - 灯塔量化"
dict[2] = "2 - lightquant"

tinydict = {'name': 'lightquant','code':1, 'site': 'www.runoob.com'}

print (dict['one']) # 输出键为 'one' 的值
print (dict[2]) # 输出键为 2 的值
print (tinydict) # 输出完整的字典
print (tinydict.keys()) # 输出所有键
print (tinydict.values()) # 输出所有值

9. Python数据类型转换

1
2
3
4
5
6
7
8
9
10
11
12
13
14
15
16
17
18
19
20
21
22
23
24
25
26
27
28
29
30
31
32
33
34
35
36
37
38
39
40
41
42
# 1、int(n,base)函数
a = int('110',2) # 二进制转换10进制,必须是字符串类型
b = int(3.6) # 向下取整

# 2、float() 可是是字符串,也可以是数字,转换为浮点类型

# 3、complex() 函数 返回复数表达式(复数是什么?有什么用呢?)
complex(1, 2) # return (1 + 2j)
complex(1) # return (1 + 0j)
complex("1+2j") # return (1 + 2j)

# 4、str() 函数 将对象转化为适于人阅读的形式。
dict = {'light': 'lightquant.com', 'google': 'google.com'}
# return "{'light': 'lightquant.com', 'google': 'google.com'}"

# 5、repr() 函数 与str() 类似

# 6、eval() 函数
x = 2 ; eval('x * 2') # return 4

# 7、tuple()函数 将列表转换为元组。。

# 8、list()方法 将元组转换为列表。

# 9、dict() 函数 用于创建一个字典。

# 10、frozenset() 函数 返回一个冻结的集合,冻结后集合不能再添加或删除任何元素。

# 11、chr() 函数 返回值是当前整数对应的ascii字符。
print chr(0x30) # return 0
print chr(48) # return 0

# 12、ord() 函数 与chr()相反
print chr(0) # return 0

# 13、hex() 函数 返回16进制

# 14、oct() 函数 返回8进制

# 15、除法计算
10 // 3 #等于3
10 / 3 #3.33333333333333

10. 数字格式化

1
2
3
4
5
6
7
8
9
10
11
12
 print("{:.2f}".format(3.1415926));     # 保留两位小数

# {:+.2f} 带前缀'+'号
# {:.0f} 不带小数
# {:0>2d} 不足两位 ,前面补0
# {:x<4d} 不足4位,后面补x
# {:,} 逗号分隔数字,如:1,000,000
# {:.2%} 保留两位小数,再加'%'后缀
'{:b}'.format(11) # 二进制
'{:d}'.format(11) # 十进制
'{:o}'.format(11) # 八进制
'{:x}'.format(11) # 十六进制

11. 字符串内建函数

1
2
3
str.capitalize()    # 首字符会转换成大写,其余字符会转换成小写。
str.center(10, '*') # 返回10位长度的字符串,前后用'*'补充
str.count('a',0,10) # 返回字符'a'在str出现的次数

集合

1、列表

1
2
3
4
5
6
7
8
9
10
11
12
13
14
15
16
17
18
19
20
21
22
23
24
25
list = ['Google', 'light', 1997, 2000]
list[2] = 2001 # 可以更新值
del list[2] # 删除第三个参数

len([1, 2, 3]) # 返回长度
[1, 2, 3] + [4, 5, 6] # 组合
['Hi!'] * 4 # 重复
3 in [1, 2, 3] # 判断该列表中是否存在某个数
for x in [1, 2, 3]: # 遍历
print(x, end=" ")

#######函数########
len(list) # 列表长度
max(list);min(list) # 最大值 最小值
list(seq) # 将元组转换为列表
list.append(obj) # 在列表末尾添加新的对象
list.count(obj) # 统计某个元素在列表中出现的次数
list.extend(seq) # 相当于java的addAll(list);
list.index(obj) # 找出字符下标 ,没有找到会报错
list.insert(index, obj) # 插入数据
list.pop(i) # 默认删除最后一个,返回删除的值
list.remove(obj) # 删除匹配的第一个值,没有匹配会报错
list.sort(l) # 排序
list.clear() # 清空列表
list.copy() # 复制

2、元组

1
2
3
4
5
6
7
8
9
10
11
12
13
14
15
16
17
18
19
tup1 = ('Google', 'light', 1997, 2000);
tup1 = (); # 创建空元组


## 1. 元组中只包含一个元素时,需要在元素后面添加逗号,否则括号会被当作运算符使用:
tup1 = (50) ; tup2 = (50,) # tup1是整数类型,tup2才是元祖

## 2. 元组中的元素值是不允许修改的,但我们可以对元组进行连接组合
tup1 = (12, 34.56);
tup2 = ('abc', 'xyz')
# 创建一个新的元组
tup3 = tup1 + tup2;
print (tup3)

## 3. 元组中的元素值是不允许删除的,但我们可以使用del语句来删除整个元组
del tup;

## 4. 将列表转换为元组。
tuple(list1)

3、字典

1
2
3
4
5
6
7
8
9
10
11
12
13
14
15
16
17
18
19
20
d = {key1 : value1, key2 : value2 }
## 键必须是唯一的,但值则不必。

del dict['Name'] # 删除键 'Name'
dict.clear() # 清空字典
del dict # 删除字典

## 不允许同一个键出现两次。创建时如果同一个键被赋值两次,会以后面的为准
## 键必须不可变,所以可以用数字,字符串或元组充当,而用列表就不行

b = a.fromkeys(seq) # 创建一个新字典,以序列seq中元素做字典的键,val为字典所有键对应的初始值
dict.get(key, 'default') #没有就返回'default',或者None
dict.items() # 遍历返回

dict.setdefault(key, 'default')
# 如果 key 在 字典中,返回对应的值。如果不在字典中,则插入 key 及设置的默认值 default,并返回 default ,default 默认值为 None。

dict.update(dict2) # dict2 -- 添加到指定字典dict里的字典。
pop(key[,default]) # 返回值为被删除的值。key值必须给出。 否则,返回default值。
popitem() # 随机返回并删除字典中的一对键和值(一般删除末尾对)

阿里云nginx配置https

发表于 2018-03-01 | 分类于 Linux

一、阿里云申请免费证书

申请证书
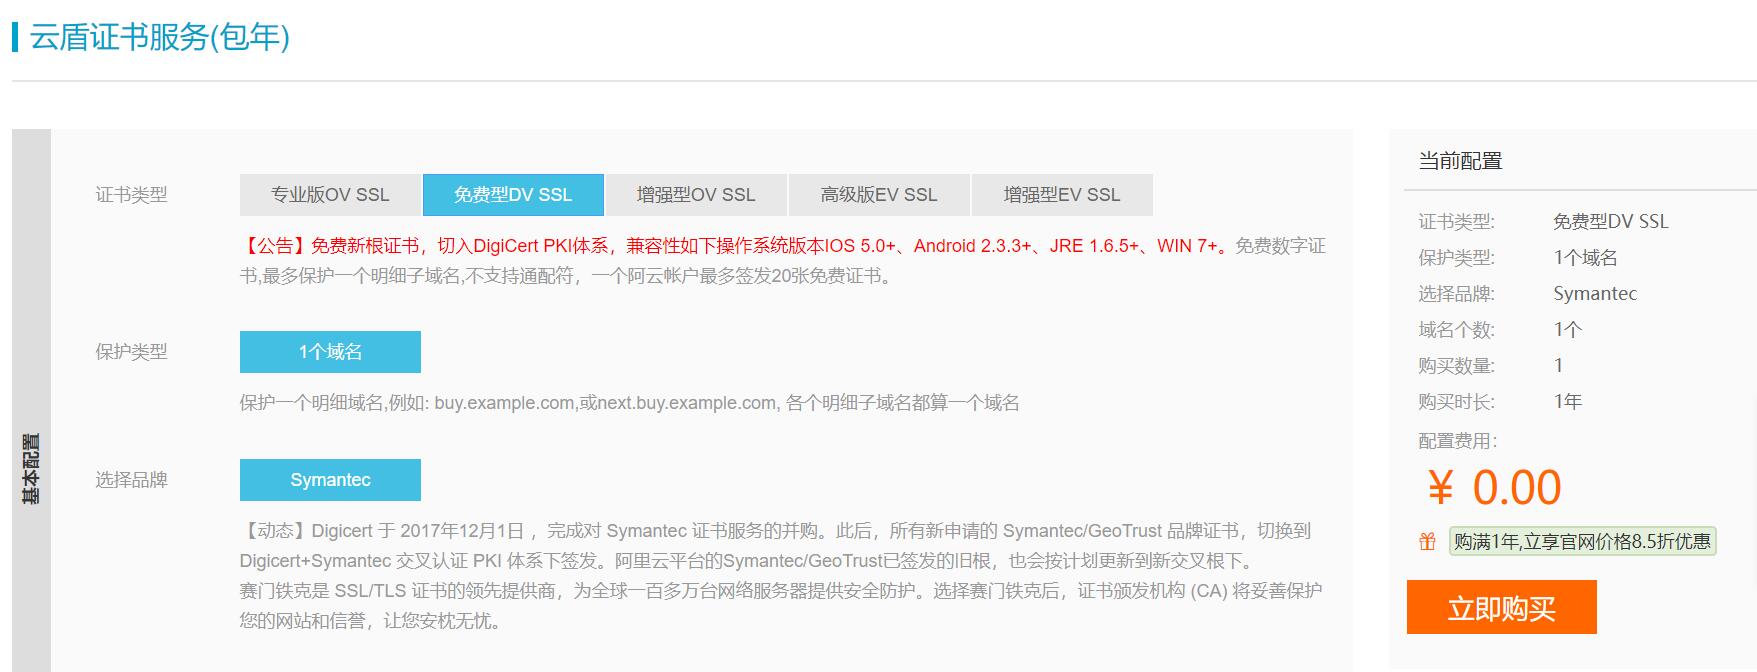
这里有个坑,找这个免费证书要先选择保护类型为“一个域名”,然后选择品牌为“Symantec”,证书类型中才会出现免费的选项。

二、下载证书

证书列表
申请要过一段时间,才能在我的列表中看到,然后补全信息,过几分钟审核通过了,就可以下载了。
下载好了,上传到服务器解压,有两个文件:

1
2
/usr/local/nginx/cert/214524977110083.pem
/usr/local/nginx/cert/214524977110083.key

三、配置 NGINX 的 HTTPS

1
2
3
4
5
6
7
8
9
10
11
12
13
14
15
16
17
18
19
20
server {
listen 443;
server_name www.lightquant.com;
ssl on;
root html;
index index.html;

ssl_certificate /usr/local/nginx/cert/214524977110083.pem
ssl_certificate_key /usr/local/nginx/cert/214524977110083.pem
ssl_session_timeout 5m;
ssl_protocols TLSv1 TLSv1.1 TLSv1.2;
ssl_ciphers AESGCM:ALL:!DH:!EXPORT:!RC4:+HIGH:!MEDIUM:!LOW:!aNULL:!eNULL;
ssl_prefer_server_ciphers on;
}

server {
listen 80;
server_name lightquant.com;
return 301 https://$server_name$request_uri;
}

完成!

activeMQ

发表于 2018-02-12 | 分类于 中间件

安装部署:

wget http://archive.apache.org/dist/activemq/apache-activemq/5.9.0/apache-activemq-5.9.0-bin.tar.gz
解压
运行:activemq start
(1)普通启动./activemq start
(2)启动并指定日志文件./activemq start> tmp / smlog
(3)后台启动方式nohup ./activemq start> / tmp / smlog
管理后台为:
http://ip:8161/admin/
连接默认端口61616

安全配置

jetty.xml中
<property name="authenticate" value="true" /> //开启认证
<property name="port" value="8191" /> //修改端口
jetty-realm.properties中修改密码

username: password [,rolename …]
用户名 : 密码 ,角色名
如:admin: admin, admin

依赖

1
2
3
<dependency>
<groupId>org.springframework.boot</groupId>
<artifactId>spring-boot-starter-activemq</artifactId> </dependency>

springMVC

1
2
3
4
5
6
7
8
9
10
<dependency>
<groupId>org.apache.activemq</groupId>
<artifactId>activemq-core</artifactId>
<version>5.7.0</version>
</dependency>
<dependency>
<groupId>org.springframework</groupId>
<artifactId>spring-jms</artifactId>
<version>${spring.version}</version>
</dependency>

配置

1
2
3
4
5
6
7
8
9
10
11
12
13
14
15
#==================activemq Config Start==================
spring.activemq.broker-url=tcp://127.0.0.1:61616?jms.prefetchPolicy.all=2
spring.activemq.in-memory=true
spring.activemq.password=admin
spring.activemq.user=admin
#如果为True,则是Topic;如果是false或者默认,则是queue
spring.jms.pub-sub-domain=false
spring.activemq.packages.trust-all=false
spring.activemq.packages.trusted=
spring.activemq.pool.configuration.*=
spring.activemq.pool.enabled=false
spring.activemq.pool.expiry-timeout=0
spring.activemq.pool.idle-timeout=30000
spring.activemq.pool.max-connections=1
#==================activemq Config End ==================

springMVC配置

1
2
3
4
5
6
7
8
9
10
11
12
13
14
15
16
17
18
19
20
21
22
23
24
25
26
27
28
29
30
31
32
33
34
35
36
37
38
39
40
41
42
43
44
<context:annotation-config />
<amq:connectionFactory id="amqConnectionFactory"
brokerURL="tcp://localhost:61616"
userName="admin"
password="admin" />

<!-- 配置JMS连接工长 -->
<bean id="connectionFactory"
class="org.springframework.jms.connection.CachingConnectionFactory">
<constructor-arg ref="amqConnectionFactory" />
<property name="sessionCacheSize" value="100" />
</bean>
<!--spring jms 为我们提供的连接池-->
<bean id="connectionFactory" class="org.springframework.jms.connection.SingleConnectionFactory">
<property name="targetConnectionFactory" ref="targetConnectionFactory" />
</bean>
<!--一个队列的目的地,点对点的-->
<bean id="queueDestionation" class="org.apache.activemq.command.ActiveMQQueue">
<constructor-arg value="queue" />
</bean>
<!--一个主题,发布订阅-->
<bean id="topicDestionation" class="org.apache.activemq.command.ActiveMQTopic">
<constructor-arg value="topic" />
</bean>
<!-- 配置JMS模板(Queue),Spring提供的JMS工具类,它发送、接收消息。 -->
<bean id="jmsTemplate" class="org.springframework.jms.core.JmsTemplate">
<property name="connectionFactory" ref="connectionFactory" />
<property name="defaultDestination" ref="demoQueueDestination" />
<property name="receiveTimeout" value="10000" />
<!-- true是topic,false是queue,默认是false,此处显示写出false -->
<property name="pubSubDomain" value="false" />
</bean>

<bean class="com.imooc.jms.producer.ProducerServiceImpl"></bean>
<!--加入监听器 -->
<bean id="queueMessageListener" class="com.qqw.active.QueueMessageListener" />

<!-- 显示注入消息监听容器(Queue),配置连接工厂,监听的目标是demoQueueDestination,监听器是上面定义的监听器 -->
<bean id="queueListenerContainer"
class="org.springframework.jms.listener.DefaultMessageListenerContainer">
<property name="connectionFactory" ref="connectionFactory" />
<property name="destination" ref="queueDestionation" />
<property name="messageListener" ref="queueMessageListener" />
</bean>

监听

1
2
3
4
   @JmsListener(destination="SPEED_DOWN")
public void receive(String msg) {
System.out.println(msg);
}
1
2
3
4
5
6
7
8
9
10
11
12
13
14
15
16
17
18
19
20
21
22
public class QueueMessageListener implements MessageListener {  


//当收到消息后,自动调用该方法
@Override
public void onMessage(Message message) {

TextMessage tm = (TextMessage) message;
try {
System.out.println("QueueMessageListener监听到了文本消息:\t"
+ tm.getText());

Person fromJson = JSON.parseObject(tm.getText(), Person.class);
System.out.println(fromJson.toString());

//do something ...
} catch (JMSException e){ e.printStackTrace();
}
}
}

}

发送

1
2
3
Destination destination = new ActiveMQQueue("SPEED_DOWN");// 这里定义了Queue的key
jsmTemplate.convertAndSend(destination, string+price);
//首先要注入jmsTemplate

springMVC

1
2
3
4
5
6
7
8
9
10
11
12
13
14
15
16
17
18
19
实现类
public class ProducerServiceImpl implements ProducerService {
@Autowired
JmsTemplate jmsTemplate;
@Resource(name = "queueDestionation")
Destination destination;

@Override
public void sendMessage(final String message) {
jmsTemplate.send(destination, new MessageCreator() {
@Override
public Message createMessage(Session session) throws JMSException {
TextMessage textMessage = session.createTextMessage(message);
System.out.println("发送消息:"+textMessage.getText());
return textMessage;
}
});
}
}

其他

队列模式:生产者先发送消息,消费者后消费消息,消息被平均消费掉
主题模式:消费者先订阅消息,生产者产出的消息才可以被消费者接收到,而且是全部接收到的

springBoot

发表于 2018-02-11 | 分类于 java框架

thymeleaf

依赖:

1
2
3
4
<dependency>
<groupId>org.springframework.boot</groupId>
<artifactId>spring-boot-starter-thymeleaf</artifactId>
</dependency>

配置:

1
2
3
4
5
6
7
8
9
10
11
12
13
14
15
16
17
18
19
20
21
22
23
24
25
# THYMELEAF (ThymeleafAutoConfiguration)
#开启模板缓存(默认值:true)
spring.thymeleaf.cache=true
#Check that the template exists before rendering it.
spring.thymeleaf.check-template=true
#检查模板位置是否正确(默认值:true)
spring.thymeleaf.check-template-location=true
#Content-Type的值(默认值:text/html)
spring.thymeleaf.content-type=text/html
#开启MVC Thymeleaf视图解析(默认值:true)
spring.thymeleaf.enabled=true
#模板编码
spring.thymeleaf.encoding=UTF-8
#要被排除在解析之外的视图名称列表,用逗号分隔
spring.thymeleaf.excluded-view-names=
#要运用于模板之上的模板模式。另见StandardTemplate-ModeHandlers(默认值:HTML5)
spring.thymeleaf.mode=HTML5
#在构建URL时添加到视图名称前的前缀(默认值:classpath:/templates/)
spring.thymeleaf.prefix=classpath:/templates/
#在构建URL时添加到视图名称后的后缀(默认值:.html)
spring.thymeleaf.suffix=.html
#Thymeleaf模板解析器在解析器链中的顺序。默认情况下,它排第一位。顺序从1开始,只有在定义了额外的TemplateResolver Bean时才需要设置这个属性。
spring.thymeleaf.template-resolver-order=
#可解析的视图名称列表,用逗号分隔
spring.thymeleaf.view-names=

常见使用:
1、在html页面中引入thymeleaf命名空间,即<html xmlns:th=http://www.thymeleaf.org></html>,此时在html模板文件中动态的属性使用th:命名空间修饰

2、引用静态资源文件,比如CSS和JS文件,语法格式为”@{}”,如@{/js/blog/blog.js}会引入/static目录下的/js/blog/blog.js文件

3、访问spring-mvc中model的属性,语法格式为”${}”,如${user.id}可以获取model里的user对象的id属性

4、循环

1
2
3
4
5
6
7
8
9
10
<tr  th:each="collect,iterStat : ${collects}"> 
<th scope="row" th:text="${collect.id}">1</th>
<td >
<img th:src="${collect.webLogo}"/>
</td>
<td th:text="${collect.url}">Mark</td>
<td th:text="${collect.title}">Otto</td>
<td th:text="${collect.description}">@mdo</td>
<td th:text="${terStat.index}">index</td>
</tr>

iterStat称作状态变量,属性有:
index:当前迭代对象的index(从0开始计算)
count: 当前迭代对象的index(从1开始计算)
size:被迭代对象的大小
current:当前迭代变量
even/odd:布尔值,当前循环是否是偶数/奇数(从0开始计算)
first:布尔值,当前循环是否是第一个
last:布尔值,当前循环是否是最后一个

5、判断,在html标签中,加入th:if=”表达式”可以根据条件显示html元素

1
2
3
<span th:if="${not #lists.isEmpty(blog.publishTime)}">
<span id="publishtime" th:text="${#dates.format(blog.publishTime, 'yyyy-MM-dd HH:mm:ss')}"></span>
</span>

以上代码表示若blog.publishTime时间不为空,则显示时间

6、时间的格式化,

1
${#dates.format(blog.publishTime,'yyyy-MM-dd HH:mm:ss')}

表示将时间格式化为”yyyy-MM-dd HH:mm:ss”格式化写法与Java格式化Date的写法是一致的。

7、字符串拼接,有两种形式
比如拼接这样一个URL:/blog/delete/{blogId}
第一种:th:href="'/blog/delete/' + ${blog.id }"
第二种:th:href="${'/blog/delete/' + blog.id }"

8、布局
定义代码片段:

1
2
3
<footer th:fragment="copy"> 
? 2016
</footer>

在页面任何地方引入:

1
2
3
4
5
<body> 
<div th:include="footer :: copy"></div>
<div th:replace="footer :: copy"></div>
<div th:insert="footer :: copy"></div>
</body>

th:include 和 th:replace区别,include只是加载,replace是替换

也可以在引用模版的时候传参:

1
<head th:include="layout :: htmlhead" th:with="title='Hello'"></head>

layout 是文件地址,如果有文件夹可以这样写 fileName/layout:htmlhead
htmlhead 是指定义的代码片段 如 th:fragment=”copy”

下面是一个常用的后台页面布局,将整个页面分为头部,尾部、菜单栏、隐藏栏,点击菜单只改变content区域的页面

1
2
3
4
5
6
7
8
9
<body class="layout-fixed">
<div th:fragment="navbar" class="wrapper" role="navigation">
<div th:replace="fragments/header :: header">Header</div>
<div th:replace="fragments/left :: left">left</div>
<div th:replace="fragments/sidebar :: sidebar">sidebar</div>
<div layout:fragment="content" id="content" ></div>
<div th:replace="fragments/footer :: footer">footer</div>
</div>
</body>

任何页面想使用这样的布局值只需要替换中见的 content模块即可

1
2
3
4
<html xmlns:th="http://www.thymeleaf.org" layout:decorator="layout">
<body>
<div layout:fragment="content">我是内容</div>
</body>

9、点击事件:
th:onclick="'javascript:toxueqiu(\''+${todayBuy.code}+'\')'"
JS中使用

1
2
3
4
<script th:inline="javascript">
var data = [[${data}]]
//var dd="&&"+"<";
</script>

10、th:style
根据属性值改变背景

1
<div class="media-object resource-card-image" th:style="'background:url(' + @{(${collect.webLogo}=='' ? 'img/favicon.png' : ${collect.webLogo})} + ')'" ></div>

11、内嵌变量
为了模板更加易用,Thymeleaf还提供了一系列Utility对象(内置于Context中),可以通过#直接访问:

dates : java.util.Date的功能方法类。
calendars : 类似#dates,面向java.util.Calendar
numbers : 格式化数字的功能方法类
strings : 字符串对象的功能类,contains,startWiths,prepending/appending等等。
objects: 对objects的功能类操作。
bools: 对布尔值求值的功能方法。
arrays:对数组的功能类方法。
lists: 对lists功能类方法
sets
maps
…
举例:

1
2
3
4
5
6
7
8
9
10
11
12
13
14
15
16
17
18
${#dates.format(date, 'dd/MMM/yyyy HH:mm')}
${#dates.arrayFormat(datesArray, 'dd/MMM/yyyy HH:mm')}
${#dates.listFormat(datesList, 'dd/MMM/yyyy HH:mm')}
${#dates.setFormat(datesSet, 'dd/MMM/yyyy HH:mm')}
${#dates.createNow()}
${#dates.createToday()}
${#strings.isEmpty(name)}
${#strings.arrayIsEmpty(nameArr)}
${#strings.listIsEmpty(nameList)}
${#strings.setIsEmpty(nameSet)}
${#strings.startsWith(name,'Don')}
${#strings.endsWith(name,endingFragment)}
${#strings.length(str)}
${#strings.equals(str)}
${#strings.equalsIgnoreCase(str)}
${#strings.concat(str)}
${#strings.concatReplaceNulls(str)}
${#strings.randomAlphanumeric(count)}

AOP

添加依赖

1
2
3
4
<dependency>
<groupId>org.springframework.boot</groupId>
<artifactId>spring-boot-starter-aop</artifactId>
</dependency>

代码实例

1
2
3
4
5
6
7
8
9
10
11
12
13
14
15
16
17
18
19
20
21
22
23
24
25
26
27
28
29
30
31
32
33
34
35
36
37
38
39
40
41
42
43
44
@Aspect
@Component
public class HttpAspect {

private final static Logger logger = LoggerFactory.getLogger(HttpAspect.class);

@Pointcut("execution(public * com.gjd.controller.GirlController.*(..))") //该类下所有方法
public void log(){
//定义一个全局的切入点 下面 可以直接 log()引用
}

@Before("log()")
public void doBefore(JoinPoint joinPoint){ //之前执行

ServletRequestAttributes attributes = (ServletRequestAttributes) RequestContextHolder.getRequestAttributes();
HttpServletRequest request = attributes.getRequest(); //获取request对象
//url
logger.info("url={}", request.getRequestURL());

//method
logger.info("method={}", request.getMethod());

//ip
logger.info("ip={}", request.getRemoteAddr());

//类方法
logger.info("class_method={}", joinPoint.getSignature().getDeclaringTypeName() + "." + joinPoint.getSignature().getName());
//通过JoinPoint对象获取类方法的对象

//参数
logger.info("args={}", joinPoint.getArgs());
//通过JoinPoint对象获取传入的对象

}
@After("log()")
public void doAfter() { //之后执行
logger.info("222222222222");
}

@AfterReturning(returning = "object", pointcut = "log()") //获取调用方法返回的信息
public void doAfterReturning(Object object) {
logger.info("response={}", object.toString());
}
}

日志

一、设置项目启动的日志等级
1 在运行命令后加入–debug标志,如:$ java -jar springTest.jar –debug
2 在application.properties中配置debug=true,该属性置为true的时候,核心Logger
(包含嵌入式容器、hibernate、spring)会输出更多内容,但是你自己应用的日志并不会输出为DEBUG级别。

二、日志输出路径
默认情况下,Spring Boot将日志输出到控制台,不会写到日志文件。如果要编写除控制台输出之外的日志文件,则需在application.properties中设置logging.file或logging.path属性。

1 logging.file,设置文件,可以是绝对路径,也可以是相对路径。如:logging.file=my.log

2 logging.path,设置目录,会在该目录下创建spring.log文件,并写入日志内容,如:logging.path=/var/log

如果只配置 logging.file,会在项目的当前路径下生成一个 xxx.log 日志文件。
如果只配置 logging.path,在 /var/log文件夹生成一个日志文件为 spring.log

注:二者不能同时使用,如若同时使用,则只有logging.file生效

三、日志级别控制

1 logging.level.com.dudu=DEBUG:com.dudu包下所有class以DEBUG级别输出
2 logging.level.root=WARN:root日志以WARN级别输出

四、自定义日志配置
使用logback,建议使用官方名称logback-spring.xml, logback-spring.groovy, logback.xml, logback.groovy;
spring boot可以为它添加一些spring boot特有的配置项。
如果你即想完全掌控日志配置,但又不想用logback.xml作为Logback配置的名字,可以通过logging.config属性指定自定义的名字:
logging.config=classpath:logging-config.xml

五、logback例子

1
2
3
4
5
6
7
8
9
10
11
12
13
14
15
16
17
18
19
20
21
22
23
24
25
26
27
28
29
30
31
32
33
34
35
36
37
38
39
40
41
<?xml version="1.0" encoding="UTF-8"?>
<configuration scan="true" scanPeriod="60 seconds" debug="false">
<contextName>logback</contextName>
<property name="log.path" value="E:\\test\\logback.log" />
<!--输出到控制台-->
<appender name="console" class="ch.qos.logback.core.ConsoleAppender">
<!-- <filter class="ch.qos.logback.classic.filter.ThresholdFilter">
<level>ERROR</level>
</filter>-->
<encoder>
<pattern>%d{HH:mm:ss.SSS} %contextName [%thread] %-5level %logger{36} - %msg%n</pattern>
</encoder>
</appender>

<!--输出到文件-->
<appender name="file" class="ch.qos.logback.core.rolling.RollingFileAppender">
<file>${log.path}</file>
<rollingPolicy class="ch.qos.logback.core.rolling.TimeBasedRollingPolicy">
<fileNamePattern>logback.%d{yyyy-MM-dd}.log</fileNamePattern>
<maxHistory>30</maxHistory>
<!--表示只保留最近30天的日志-->
<totalSizeCap>1GB</totalSizeCap>
<!--设置为1GB的话,那么到了这个值,就会删除旧的日志。-->
</rollingPolicy>
<encoder>
<pattern>%d{HH:mm:ss.SSS} %contextName [%thread] %-5level %logger{36} - %msg%n</pattern>
</encoder>
</appender>

<root level="info">
<appender-ref ref="console" />
<appender-ref ref="file" />
</root>

<!-- logback为java中的包 -->
<logger name="com.dudu.controller"/>
<!--logback.LogbackDemo:类的全路径 -->
<logger name="com.dudu.controller.LearnController" level="WARN" additivity="false">
<appender-ref ref="console"/>
</logger>
</configuration>

注:
scan:当此属性设置为true时,配置文件如果发生改变,将会被重新加载,默认值为true。
scanPeriod:设置监测配置文件是否有修改的时间间隔,如果没有给出时间单位,默认单位是毫秒。当scan为true时,此属性生效。默认的时间间隔为1分钟。
debug:当此属性设置为true时,将打印出logback内部日志信息,实时查看logback运行状态。默认值为false。

2 表示对日志进行编码:
%d{HH: mm:ss.SSS}——日志输出时间
%thread——输出日志的进程名字,这在Web应用以及异步任务处理中很有用
%-5level——日志级别,并且使用5个字符靠左对齐
%logger{36}——日志输出者的名字
%msg——日志消息
%n——平台的换行符

六、开发,测试环境切换
1 必须在该文件名logback-spring.xml文件写

1
2
3
4
5
6
7
8
<!-- 测试环境+开发环境. 多个使用逗号隔开. -->
<springProfile name="test,dev">
<logger name="com.dudu.controller" level="info" />
</springProfile>
<!-- 生产环境. -->
<springProfile name="prod">
<logger name="com.dudu.controller" level="ERROR" />
</springProfile>

2 可以启动服务的时候指定 profile (如不指定使用默认),如指定prod 的方式为:
java -jar xxx.jar –spring.profiles.active=prod

热部署

pom文件添加

1
2
3
4
5
<dependency>
<groupId>org.springframework.boot</groupId>
<artifactId>spring-boot-devtools</artifactId>
<optional>true</optional>
</dependency>

加载文件

资源文件

1
2
@Configuration
@PropertySource("classpath:test.properties")

xml文件

1
2
3
@Configuration
@ImportResource(locations={"classpath:application-bean.xml"})
//locations= {"file:d:/test/application-bean1.xml"}

文件上传

跟springMVC类似 配置从xml转向注解

1
2
3
4
5
6
7
8
9
10
11
@Bean 
public MultipartConfigElement multipartConfigElement() {
MultipartConfigFactory factory = new MultipartConfigFactory();
//// 设置文件大小限制 ,超了,页面会抛出异常信息,这时候就需要进行异常信息的处理了;
factory.setMaxFileSize("128KB"); //KB,MB
/// 设置总上传数据总大小
factory.setMaxRequestSize("256KB");
//Sets the directory location where files will be stored.
//factory.setLocation("路径地址");
returnfactory.createMultipartConfig();
}

nginx

发表于 2018-02-11 | 分类于 Linux

一、nginx依赖的包

  1. gcc
    安装nginx需要先将官网下载的源码进行编译,编译依赖gcc环境,如果没有gcc环境,需要安装gcc:
    yum install gcc-c++
  2. PCRE
    PCRE(Perl Compatible Regular Expressions)是一个Perl库,包括 perl 兼容的正则表达式库。
    nginx的http模块使用pcre来解析正则表达式,所以需要在linux上安装pcre库。
    yum install -y pcre pcre-devel
    注:pcre-devel是使用pcre开发的一个二次开发库。nginx也需要此库。
  3. zlib
    zlib库提供了很多种压缩和解压缩的方式,nginx使用zlib对http包的内容进行gzip,所以需要在linux上安装zlib库。
    yum install -y zlib zlib-devel
  4. openssl
    OpenSSL 是一个强大的安全套接字层密码库,囊括主要的密码算法、常用的密钥和证书封装管理功能及SSL协议,并提供丰富的应用程序供测试或其它目的使用。nginx不仅支持http协议,还支持https(即在ssl协议上传输http),所以需要在linux安装openssl库。
    yum install -y openssl openssl-devel
    或者
    wget https://www.openssl.org/source/openssl-1.1.0g.tar.gz
    //https://www.openssl.org/source

二、安装步骤

第一步:把nginx的源码上传到linux系统
第二步:把压缩包解压缩。
第三步:进行configure。
第四步:make
第五步:make install
同时编译nginx+openssl:
./configure --prefix=/usr/local/nginx --with-http_stub_status_module --with-http_gzip_static_module --with-http_ssl_module --with-openssl=/usr/local/openssl-1.1.0g make && make install
生成证书:
openssl req -new -x509 -nodes -out server.crt -keyout server.key

三、启停服务

关闭nginx:
可以使用kill命令,但是不推荐使用。
推荐使用:./nginx -s stop
刷新配置:
./nginx -s reload

四、配置文件

配置文件主要由四部分组成:main(全区设置),server(主机配置),upstream(负载均衡服务器设置),和location(URL匹配特定位置设置)。
1)全局变量

1
2
3
4
5
6
7
8
9
10
11
12
13
14
15
16
17
18
19
20
21
22
#Nginx的worker进程运行用户以及用户组
#user nobody nobody;
#Nginx开启的进程数
worker_processes 1;
#worker_processes auto;
#以下参数指定了哪个cpu分配给哪个进程,一般来说不用特殊指定。如果一定要设的话,用0和1指定分配方式.
#这样设就是给1-4个进程分配单独的核来运行,出现第5个进程是就是随机分配了。
eg:
#worker_processes 4 #4核CPU
#worker_cpu_affinity 0001 0010 0100 1000

#定义全局错误日志定义类型,[debug|info|notice|warn|crit]
#error_log logs/error.log info;
#指定进程ID存储文件位置
#pid logs/nginx.pid;
#一个nginx进程打开的最多文件描述符数目,理论值应该是最多打开文件数(ulimit -n)与nginx进程数相除,但是nginx分配请求并不是那么均匀,所以最好与ulimit -n的值保持一致。
#vim /etc/security/limits.conf
# * soft nproc 65535
# * hard nproc 65535
# * soft nofile 65535
# * hard nofile 65535
worker_rlimit_nofile 65535;

2)事件配置

1
2
3
4
5
6
7
8
9
events {
#use [ kqueue | rtsig | epoll | /dev/poll | select | poll ]; epoll模型是Linux 2.6以上版本内核中的高性能网络I/O模型,如果跑在FreeBSD上面,就用kqueue模型。
use epoll;
#每个进程可以处理的最大连接数,理论上每台nginx服务器的最大连接数为worker_processes*worker_connections。理论值:worker_rlimit_nofile/worker_processes
#注意:最大客户数也由系统的可用socket连接数限制(~ 64K),所以设置不切实际的高没什么好处
worker_connections 65535;
#worker工作方式:串行(一定程度降低负载,但服务器吞吐量大时,关闭使用并行方式)
#multi_accept on;
}

3)http参数

1
2
3
4
5
6
7
8
9
10
11
12
13
14
15
16
17
18
19
20
21
22
23
24
25
26
27
28
29
30
31
32
33
34
35
36
37
38
39
40
41
42
43
44
45
46
47
48
49
50
51
52
53
54
55
56
57
58
59
60
61
62
63
64
65
66
67
68
69
70
71
72
73
74
75
#文件扩展名与文件类型映射表
include mime.types;
#默认文件类型
default_type application/octet-stream;

#日志相关定义
#log_format main '$remote_addr - $remote_user [$time_local] "$request" '
# '$status $body_bytes_sent "$http_referer" '
# '"$http_user_agent" "$http_x_forwarded_for"';
#定义日志的格式。后面定义要输出的内容。
#1.$remote_addr 与$http_x_forwarded_for 用以记录客户端的ip地址;
#2.$remote_user :用来记录客户端用户名称;
#3.$time_local :用来记录访问时间与时区;
#4.$request :用来记录请求的url与http协议;
#5.$status :用来记录请求状态;
#6.$body_bytes_sent :记录发送给客户端文件主体内容大小;
#7.$http_referer :用来记录从那个页面链接访问过来的;
#8.$http_user_agent :记录客户端浏览器的相关信息
#连接日志的路径,指定的日志格式放在最后。
#access_log logs/access.log main;
#只记录更为严重的错误日志,减少IO压力
error_log logs/error.log crit;
#关闭日志
#access_log off;

#默认编码
#charset utf-8;
#服务器名字的hash表大小
server_names_hash_bucket_size 128;
#客户端请求单个文件的最大字节数
client_max_body_size 8m;
#指定来自客户端请求头的hearerbuffer大小
client_header_buffer_size 32k;
#指定客户端请求中较大的消息头的缓存最大数量和大小。
large_client_header_buffers 4 64k;
#开启高效传输模式。
sendfile on;
#防止网络阻塞
tcp_nopush on;
tcp_nodelay on;

#客户端连接超时时间,单位是秒
keepalive_timeout 60;
#客户端请求头读取超时时间
client_header_timeout 10;
#设置客户端请求主体读取超时时间
client_body_timeout 10;
#响应客户端超时时间
send_timeout 10;

#FastCGI相关参数是为了改善网站的性能:减少资源占用,提高访问速度。
fastcgi_connect_timeout 300;
fastcgi_send_timeout 300;
fastcgi_read_timeout 300;
fastcgi_buffer_size 64k;
fastcgi_buffers 4 64k;
fastcgi_busy_buffers_size 128k;
fastcgi_temp_file_write_size 128k;

#gzip模块设置
#开启gzip压缩输出
gzip on;
#最小压缩文件大小
gzip_min_length 1k;
#压缩缓冲区
gzip_buffers 4 16k;
#压缩版本(默认1.1,前端如果是squid2.5请使用1.0)
gzip_http_version 1.0;
#压缩等级 1-9 等级越高,压缩效果越好,节约宽带,但CPU消耗大
gzip_comp_level 2;
#压缩类型,默认就已经包含text/html,所以下面就不用再写了,写上去也不会有问题,但是会有一个warn。
gzip_types text/plain application/x-javascript text/css application/xml;
#前端缓存服务器缓存经过压缩的页面

gzip_vary on;

4)虚拟主机基本设置

1
2
3
4
5
6
7
8
9
10
11
12
13
14
15
16
17
18
19
20
21
22
23
24
25
26
27
28
29
30
31
32
33
34
35
36
37
38
39
40
41
42
43
44
45
46
47
48
49
50
51
52
53
54
55
56
57
58
59
60
61
62
63
64
65
66
67
68
69
#虚拟主机定义
server {
#监听端口
listen 80;
#访问域名
server_name localhost;
#编码格式,若网页格式与此不同,将被自动转码
#charset koi8-r;
#虚拟主机访问日志定义
#access_log logs/host.access.log main;
#对URL进行匹配
location / {
#访问路径,可相对也可绝对路径
root html;
#首页文件。以下按顺序匹配
index index.html index.htm;
}

#错误信息返回页面
#error_page 404 /404.html;
# redirect server error pages to the static page /50x.html
#
error_page 500 502 503 504 /50x.html;
location = /50x.html {
root html;
}

#访问URL以.php结尾则自动转交给127.0.0.1
# proxy the PHP scripts to Apache listening on 127.0.0.1:80
#
#location ~ \.php$ {
# proxy_pass http://127.0.0.1;
#}
#php脚本请求全部转发给FastCGI处理
# pass the PHP scripts to FastCGI server listening on 127.0.0.1:9000
#
#location ~ \.php$ {
# root html;
# fastcgi_pass 127.0.0.1:9000;
# fastcgi_index index.php;
# fastcgi_param SCRIPT_FILENAME /scripts$fastcgi_script_name;
# include fastcgi_params;
#}

#禁止访问.ht页面 (需ngx_http_access_module模块)
# deny access to .htaccess files, if Apache's document root
# concurs with nginx's one
#
#location ~ /\.ht {
# deny all;
#}
}
#HTTPS虚拟主机定义
# HTTPS server
#
#server {
# listen 443 ssl;
# server_name localhost;
# ssl_certificate cert.pem;
# ssl_certificate_key cert.key;
# ssl_session_cache shared:SSL:1m;
# ssl_session_timeout 5m;
# ssl_ciphers HIGH:!aNULL:!MD5;
# ssl_prefer_server_ciphers on;
# location / {
# root html;
# index index.html index.htm;
# }
#}

5)Nignx状态监控

1
2
3
4
5
6
7
8
9
10
11
12
#Nginx运行状态,StubStatus模块获取Nginx自启动的工作状态(编译时要开启对应功能)
#location /NginxStatus {
# #启用StubStatus的工作访问状态
# stub_status on;
# #指定StubStaus模块的访问日志文件
# access_log logs/Nginxstatus.log;
# #Nginx认证机制(需Apache的htpasswd命令生成)
# #auth_basic "NginxStatus";
# #用来认证的密码文件
# #auth_basic_user_file ../htpasswd;
#}
访问:http://IP/NginxStatus(测试就不加密码验证相关)

6)反向代理

1
2
3
4
5
6
7
8
9
10
11
12
13
14
15
16
17
18
19
20
21
22
23
24
25
26
27
28
29
30
31
32
33
34
35
36
37
38
39
40
41
42
43
44
45
46
47
48
49
50
51
52
53
54
55
56
57
58
59
60
61
62
63
64
#以下配置追加在HTTP的全局变量中

#nginx跟后端服务器连接超时时间(代理连接超时)
proxy_connect_timeout 5;
#后端服务器数据回传时间(代理发送超时)
proxy_send_timeout 5;
#连接成功后,后端服务器响应时间(代理接收超时)
proxy_read_timeout 60;
#设置代理服务器(nginx)保存用户头信息的缓冲区大小
proxy_buffer_size 16k;
#proxy_buffers缓冲区,网页平均在32k以下的话,这样设置
proxy_buffers 4 32k;
#高负荷下缓冲大小(proxy_buffers*2)
proxy_busy_buffers_size 64k;
#设定缓存文件夹大小,大于这个值,将从upstream服务器传
proxy_temp_file_write_size 64k;
#反向代理缓存目录
proxy_cache_path /data/proxy/cache levels=1:2 keys_zone=cache_one:500m inactive=1d max_size=1g;
#levels=1:2 设置目录深度,第一层目录是1个字符,第2层是2个字符
#keys_zone:设置web缓存名称和内存缓存空间大小
#inactive:自动清除缓存文件时间。
#max_size:硬盘空间最大可使用值。
#指定临时缓存文件的存储路径(路径需和上面路径在同一分区)
proxy_temp_path
/data/proxy/temp

#服务配置
server {
#侦听的80端口
listen 80;
server_name localhost;
location / {
#反向代理缓存设置命令(proxy_cache zone|off,默认关闭所以要设置)
proxy_cache cache_one;
#对不同的状态码缓存不同时间
proxy_cache_valid 200 304 12h;
#设置以什么样参数获取缓存文件名
proxy_cache_key $host$uri$is_args$args;
#后7端的Web服务器可以通过X-Forwarded-For获取用户真实IP
proxy_set_header Host $host;
proxy_set_header X-Real-IP $remote_addr;
proxy_set_header X-Forwarded-For $proxy_add_x_forwarded_for;

#代理设置
proxy_pass http://IP;
#文件过期时间控制
expires 1d;
}
#配置手动清楚缓存(实现此功能需第三方模块 ngx_cache_purge)
#http://www.123.com/2017/0316/17.html访问
#http://www.123.com/purge/2017/0316/17.html清楚URL缓存
location ~ /purge(/.*) {
allow 127.0.0.1;
deny all;
proxy_cache_purge cache_one $host$1$is_args$args;
}
#设置扩展名以.jsp、.php、.jspx结尾的动态应用程序不做缓存
location ~.*\.(jsp|php|jspx)?$ {
proxy_set_header Host $host;
proxy_set_header X-Real-IP $remote_addr;
proxy_set_header X-Forwarded-For $proxy_add_x_forwarded_for;

proxy_pass http://http://IP;
}

7)负载均衡

1
2
3
4
5
6
7
8
9
10
11
12
13
14
15
16
17
18
19
20
21
22
#负载均衡服务器池
upstream my_server_pool {
#调度算法
#1.轮循(默认)(weight轮循权值)
#2.ip_hash:根据每个请求访问IP的hash结果分配。(会话保持)
#3.fair:根据后端服务器响应时间最短请求。(upstream_fair模块)
#4.url_hash:根据访问的url的hash结果分配。(需hash软件包)
#参数:
#down:表示不参与负载均衡
#backup:备份服务器
#max_fails:允许最大请求错误次数
#fail_timeout:请求失败后暂停服务时间。
server 192.168.1.109:80 weight=1 max_fails=2 fail_timeout=30;
server 192.168.1.108:80 weight=2 max_fails=2 fail_timeout=30;
}
#负载均衡调用
server {
...
location / {
proxy_pass http://my_server_pool;
}
}

8)URL重写

1
2
3
4
5
6
7
8
9
10
11
12
#根据不同的浏览器URL重写
if($http_user_agent ~ Firefox){
rewrite ^(.*)$ /firefox/$1 break;
}
if($http_user_agent ~ MSIE){
rewrite ^(.*)$ /msie/$1 break;
}

#实现域名跳转
location / {
rewrite ^/(.*)$ https://web8.example.com$1 permanent;
}

9)IP限制

1
2
3
4
5
6
7
#限制IP访问
location / {
deny 192.168.0.2;
allow 192.168.0.0/24;
allow 192.168.1.1;
deny all;
}

10)Nginx相关命令

1
2
3
4
5
6
#启动nginx
nginx
#关闭nginx
nginx -s stop
#平滑重启
kill -HUP `cat /usr/local/nginx/logs/nginx.pid`

11)Nginx启动脚本

1
2
3
4
5
6
7
8
9
10
11
12
13
14
15
16
17
18
19
20
21
22
23
24
25
26
27
28
29
30
31
32
33
34
35
36
37
38
39
40
41
42
43
44
45
46
47
48
49
50
51
52
53
54
55
56
57
58
59
60
61
62
63
64
65
66
67
68
69
70
71
72
73
74
75
76
77
78
79
80
#!/bin/bash
#chkconfig: 2345 80 90
#description:auto_run
PATH=/bin:/sbin:/usr/bin:/usr/sbin:/usr/local/bin:/usr/local/sbin:~/bin
export PATH
# Check if user is root
if [ $(id -u) != "0" ]; then
echo "Error: You must be root to run this script!\n"
exit 1
fi
NGINXDAEMON=/usr/local/nginx/sbin/nginx
PIDFILE=/usr/local/nginx/logs/nginx.pid
function_start()
{
echo -en "\033[32;49;1mStarting nginx......\n"
echo -en "\033[39;49;0m"
if [ -f $PIDFILE ]; then
printf "Nginx is runing!\n"
exit 1
else
$NGINXDAEMON
printf "Nginx is the successful start!\n"
fi
}
function_stop()
{
echo -en "\033[32;49;1mStoping nginx......\n"
echo -en "\033[39;49;0m"
if [ -f $PIDFILE ]; then
kill `cat $PIDFILE`
printf "Nginx program is stoped\n"
else
printf "Nginx program is not runing!\n"
fi
}
function_reload()
{
echo -en "\033[32;49;1mReload nginx......\n"
echo -en "\033[39;49;0m"
function_stop
function_start
}
function_restart()
{
echo -en "\033[32;49;1mRestart nginx......\n"
echo -en "\033[39;49;0m"
printf "Reload Nginx configure...\n"
$NGINXDAEMON -t
kill -HUP `cat $PIDFILE`
printf "Nginx program is reloding!\n"
}
function_kill()
{
killall nginx
}
function_status()
{
if ! ps -ef|grep -v grep|grep 'nginx:' > /dev/null 2>&1
then
printf "Nginx is down!!!\n"
else
printf "Nginx is running now!\n"
fi
}
if [ "$1" = "start" ]; then
function_start
elif [ "$1" = "stop" ]; then
function_stop
elif [ "$1" = "reload" ]; then
function_reload
elif [ "$1" = "restart" ]; then
function_restart
elif [ "$1" = "kill" ]; then
function_kill
elif [ "$1" = "status" ]; then
function_status
else
echo -en "\033[32;49;1m Usage: nginx {start|stop|reload|restart|kill|status}\n"
echo -en "\033[39;49;0m"
fi

SSM框架整合

发表于 2018-02-10 | 分类于 java框架

配置文件

web.xml配置

1
2
3
4
5
6
7
8
9
10
11
12
13
14
15
16
17
18
19
20
21
22
23
24
25
26
27
28
29
30
31
<!-- 配置Spring字符编码过滤器 -->
<filter>
<filter-name>CharacterEncodingFilter</filter-name>
<filter-class>org.springframework.web.filter.CharacterEncodingFilter</filter-class>
<init-param>
<param-name>encoding</param-name>
<param-value>utf-8</param-value>
</init-param>
</filter>
<filter-mapping>
<filter-name>CharacterEncodingFilter</filter-name>
<url-pattern>/*</url-pattern>
</filter-mapping>
<!-- 配置DispatcherServlet -->
<servlet>
<servlet-name>mvc-dispatcher</servlet-name>
<servlet-class>org.springframework.web.servlet.DispatcherServlet</servlet-class>
<!-- 配置springMVC需要加载的配置文件
spring-dao.xml,spring-service.xml,spring-web.xml
Mybatis - > spring -> springmvc
-->
<init-param>
<param-name>contextConfigLocation</param-name>
<param-value>classpath:spring/spring-*.xml</param-value>
</init-param>
</servlet>
<servlet-mapping>
<servlet-name>mvc-dispatcher</servlet-name>
<!-- 默认匹配所有的请求 -->
<url-pattern>/</url-pattern>
</servlet-mapping>

spring配置

springMVC配置

1
2
3
4
5
6
7
8
9
10
11
12
13
14
15
16
17
18
19
20
<!-- 配置SpringMVC -->
<!-- 1.开启SpringMVC注解模式 -->
<mvc:annotation-driven validator="validator"/>
<!-- <mvc:annotation-driven /> -->
<!-- 2.静态资源默认servlet配置
(1)加入对静态资源的处理:js,gif,png
(2)允许使用"/"做整体映射
-->
<mvc:default-servlet-handler/>
<!--2.获取使用下面的:配置静态资源的访问映射,此配置中的文件,将不被前端控制器拦截 -->
<mvc:resources mapping="/js/**" location="/js/"/>
<mvc:resources mapping="/css/**" location="/css/"/>
<mvc:resources mapping="/fonts/**" location="/fonts/"/>
<mvc:resources mapping="/images/**" location="/images/"/>
<!-- 3.配置jsp 显示ViewResolver -->
<bean class="org.springframework.web.servlet.view.InternalResourceViewResolver">
<property name="viewClass" value="org.springframework.web.servlet.view.JstlView"/>
<property name="prefix" value="/WEB-INF/jsp/"/>
<property name="suffix" value=".jsp"/>
</bean>

spring-dao配置

1
2
3
4
5
6
7
8
9
10
11
12
13
14
15
16
17
18
19
20
21
22
23
24
25
26
27
28
29
30
31
32
33
34
35
36
37
38
39
40
41
42
43
44
45
46
47
48
49
50
<!-- 加载数据库资源文件 -->
<context:property-placeholder location="classpath:jdbc.properties"/>

<!-- 配置数据库连接池 -->
<bean id="dataSource" class="com.mchange.v2.c3p0.ComboPooledDataSource">
<!-- 配置连接池属性 -->
<property name="driverClass" value="${jdbc.driver}" />
<property name="jdbcUrl" value="${jdbc.url}" />
<property name="user" value="${jdbc.username}" />
<property name="password" value="${jdbc.password}" />

<!-- c3p0连接池的私有属性 -->
<property name="maxPoolSize" value="30" />
<property name="minPoolSize" value="10" />
<!-- 关闭连接后不自动commit -->
<property name="autoCommitOnClose" value="false" />
<!-- 获取连接超时时间 -->
<property name="checkoutTimeout" value="10000" />
<!-- 当获取连接失败重试次数 -->
<property name="acquireRetryAttempts" value="2" />
</bean>

<!-- 配置sqlSessionFactory对象 -->
<bean id="sqlSessionFactory" class="org.mybatis.spring.SqlSessionFactoryBean">
<!-- 注入数据库连接池 -->
<property name="dataSource" ref="dataSource" />
<!-- 配置MyBaties全局配置文件:mybatis-config.xml -->
<property name="configLocation" value="classpath:mybatis-config.xml" />
<!-- 扫描entity包 使用别名 -->
<property name="typeAliasesPackage" value="com.gao.entity" />
<!-- 扫描sql配置文件:mapper需要的xml文件 -->
<property name="mapperLocations" value="classpath:mapper/*.xml" />
</bean>

<!-- 4.配置扫描Dao接口包,动态实现Dao接口,注入到spring容器中 -->
<bean class="org.mybatis.spring.mapper.MapperScannerConfigurer">
<!-- 注入sqlSessionFactory -->
<property name="sqlSessionFactoryBeanName" value="sqlSessionFactory" />
<!-- 给出需要扫描Dao接口包 -->
<property name="basePackage" value="com.gao.dao" />
</bean>
<!-- 扫描service包下所有使用注解的类型 -->
<context:component-scan base-package="com.gao.service"/>
<!-- 配置事务管理器 -->
<bean id="transactionManager"
class="org.springframework.jdbc.datasource.DataSourceTransactionManager" >
<!-- 注入数据库连接池 -->
<property name="dataSource" ref="dataSource" />
</bean>
<tx:annotation-driven transaction-manager="transactionManager"/>

mybatis配置

1
2
3
4
5
6
7
8
9
10
11
<!-- 配置全局属性 -->
<settings>
<!-- 使用jdbc的getGeneratedKeys获取数据库自增主键值 -->
<setting name="useGeneratedKeys" value="true" />

<!-- 使用列别名替换列名 默认:true -->
<setting name="useColumnLabel" value="true" />

<!-- 开启驼峰命名转换:Table{create_time} -> Entity{createTime} -->
<setting name="mapUnderscoreToCamelCase" value="true" />
</settings>

mybatis配置

建议使用注解方式:

1
2
3
4
5
@Mapper
public interface UserMapper {
@Select("select * from `user` where username=#{name} and status=0")
public User query(String name);
}

代码

编写Controller代码

1
2
3
4
5
6
7
8
9
@Controller
@RequestMapping("/mvc")
public class mvcController {

@RequestMapping("/hello")
public String hello(){
return "hello";
}
}

常用注解

@Controller
负责注册一个bean 到spring 上下文中
@RequestMapping
注解为控制器指定可以处理哪些 URL 请求
@ResponseBody
返回json
@ModelAttribute
在方法定义上使用@ModelAttribute注解:Spring MVC 在调用目标处理方法前,会先逐个调用在方法级上标注了@ModelAttribute 的方法
在方法的入参前使用 @ModelAttribute 注解:可以从隐含对象中获取隐含的模型数据中获取对象,再将请求参数 –绑定到对象中,再传入入参将方法入参对象添加到模型中
@RequestParam 
在处理方法入参处使用 @RequestParam 可以把请求参 数传递给请求方法
@RequestParam(value="name",defaultValue="Guest")//修饰在方法参数里面
@PathVariable
绑定 URL 占位符到入参

1
2
3
4
5
6
@RequestMapping("/path/{language}/{id}")
public String documentView(Model model,
@PathVariable(value = "language") String language,
@PathVariable(value = "id") Long id
) {
}

@ExceptionHandler
注解到方法上,出现异常时会执行该方法

@ControllerAdvice
使一个Contoller成为全局的异常处理类,类中用@ExceptionHandler方法注解的方法可以处理所有Controller发生的异常
@Configuration
把一个类作为一个IoC容器,它的某个方法头上如果注册了@Bean,就会作为这个Spring容器中的Bean。
@Component
组件
@EnableScheduling
启动定时任务

传递参数

1
2
3
4
5
6
7
8
9
@RequestMapping("/show")	
public String showPerson(Map<String,Object> map){
Person p =new Person();
map.put("p", p);
p.setAge(20);
p.setName("jayjay");
return "show";
}
//前台可在Request域中取到"p"
  1. Model model这个放在方法里面的参数,然后就可以model.addAttibute(“key”,value);页面可以获取到
    Model model, Map model2, ModelMap model3都是同一个对象

  2. request传统方式

    1
    2
    3
    public String view(HttpServletRequest req,HttpSession session){

    }

使用redirect方式处理请求

1
2
3
4
5
//redirect 
@RequestMapping("/redirect")
public String redirect(){
return "redirect:hello";
}

异常的处理

1
2
3
4
5
6
7
8
@ExceptionHandler(value = UnauthorizedException.class) // 处理访问方法时权限不足问题
public String handle(Exception e) {
ModelAndView mv = new ModelAndView("error");
mv.addObject("exception", ex);
System.out.println("in testExceptionHandler");
return mv;
}
//ModelAndView 跳转加设置参数

自定义拦截器

创建一个MyInterceptor类,并实现HandlerInterceptor接口

1
2
3
4
5
6
7
8
9
10
11
12
13
14
15
16
17
18
建一个MyInterceptor类,并实现HandlerInterceptor接口
@Override
public void afterCompletion(HttpServletRequest arg0,
HttpServletResponse arg1, Object arg2, Exception arg3)
throws Exception {
System.out.println("afterCompletion");
}
@Override
public void postHandle(HttpServletRequest arg0, HttpServletResponse arg1,
Object arg2, ModelAndView arg3) throws Exception {
System.out.println("postHandle");
}
@Override
public boolean preHandle(HttpServletRequest arg0, HttpServletResponse arg1, //先執行,
Object arg2) throws Exception {
System.out.println("preHandle");
return true;
}

  1. 编写拦截器类实现接口HandlerInterceptor,重写方法afterCompletion,postHandler,
    preHandler(执行时三种方法的执行步骤为,controller方法前执行preHandler,执行controller方法后执行postHandler、afterCompletion)
    
  2. 将拦截器注册到springMVC框架中(springmvc配置文件):
    1
    2
    3
    4
    5
    6
    7
    8
    9
    10
    <mvc:interceptors>
    <mvc:interceptor>
    <mvc:mapping path="/**"/>
    <bean class="com.gao.interceptor.LoginInterceptor"></bean>
    </mvc:interceptor>
    <mvc:interceptor>
    <mvc:mapping path="/news/del"/>
    <bean class="com.gao.interceptor.LimitInterceptor"></bean>
    </mvc:interceptor>
    </mvc:interceptors>

数据效验

1
2
3
4
5
6
7
8
9
10
11
12
13
14
15
16
17
18
19
20
21
22
<!-- 配置校验器 -->
<bean id="validator" class="org.springframework.validation.beanvalidation.LocalValidatorFactoryBean">
<!-- 校验器,使用hibernate校验器 -->
<property name="providerClass" value="org.hibernate.validator.HibernateValidator"/>
<!-- 指定校验使用的资源文件,在文件中配置校验错误信息,如果不指定则默认使用classpath下面的ValidationMessages.properties文件 -->
<property name="validationMessageSource" ref="messageSource"/>
</bean>
<!-- 校验错误信息配置文件 -->
<bean id="messageSource" class="org.springframework.context.support.ReloadableResourceBundleMessageSource">
<!-- 资源文件名 -->
<property name="basenames">
<list>
<value>classpath:CustomValidationMessage</value>
</list>
</property>
<!-- 资源文件编码格式 -->
<property name="fileEncodings" value="utf-8"/>
<!-- 对资源文件内容缓存时间,单位秒 -->
<property name="cacheSeconds" value="120"/>
</bean>
<!--注入-->
<mvc:annotation-driven validator="validator"/>

实体类

1
2
3
4
   @Size(min=3,max=10,message="{errors.title}")
private String tTitle;
@NotNull(message="{errors.content}")
private String tContent;

controller

1
2
3
4
5
6
7
8
9
10
11
12
13
@RequestMapping(value="/add",method=RequestMethod.POST)
public String add(@Validated News news,BindingResult br,Model model){
//@validated 是@valid一次封装
if(br.hasErrors()){
List<ObjectError> errors = br.getAllErrors();
model.addAttribute("errors", errors);
//errors.get(0).getDefaultMessage();
FieldError name = br.getFieldError("tTitle");
System.out.println(name.getDefaultMessage());
return "addnews";
}

}

文件上传

1
2
3
4
5
6
7
8
9
10
11
12
13
14
15
16
17
18
19
<!-- 文件上传的配置 -->
<bean id="multipartResolver"
class="org.springframework.web.multipart.commons.CommonsMultipartResolver">
<!-- 指定所上传文件的总大小不能超过200KB。注意maxUploadSize属性的限制不是针对单个文件,而是所有文件的容量之和 -->
<property name="maxUploadSize" value="200000" />
<property name="defaultEncoding" value="UTF-8"/>
</bean>

<!-- 该异常是SpringMVC在检查上传的文件信息时抛出来的,而且此时还没有进入到Controller方法中 -->
<bean id="exceptionResolver"
class="org.springframework.web.servlet.handler.SimpleMappingExceptionResolver">
<property name="exceptionMappings">
<props>
<!-- 遇到MaxUploadSizeExceededException异常时,自动跳转到WebContent目录下的error.jsp页面 -->
<prop
key="org.springframework.web.multipart.MaxUploadSizeExceededException">404</prop>
</props>
</property>
</bean>

controller

1
2
3
4
5
6
7
8
9
10
11
12
13
14
15
16
17
18
19
20
21
22
23
24
25
26
27
28
29
30
31
32
33
34
35
36
37
38
39
40
41
42
@RequestMapping(value="/upload")
public String upload(@RequestParam MultipartFile[] myfile,HttpServletRequest request) throws Exception{
for (MultipartFile multipartFile : myfile) {
if(multipartFile.isEmpty()){
System.out.println("文件未上传");
}else{
String fileName = multipartFile.getOriginalFilename();
String path1 = request.getSession().getServletContext().getRealPath("image")+File.separator;

String path = path1 + new SimpleDateFormat("yyyyMMddHHmmss").format(new Date())+fileName;
System.out.println(path);
File localFile = new File(path);
multipartFile.transferTo(localFile);
}
}
return "";
}

@RequestMapping("/download")
public String download(String fileName, HttpServletRequest request,
HttpServletResponse response) throws Exception{
response.setCharacterEncoding("utf-8");
response.setContentType("multipart/form-data");
response.setHeader("Content-Disposition", "attachment;fileName="
+ fileName);
String path = request.getSession().getServletContext().getRealPath
("image")+File.separator;
InputStream inputStream = new FileInputStream(new File(path
+ fileName));
OutputStream os = response.getOutputStream();
byte[] b = new byte[2048];
int length;
while ((length = inputStream.read(b)) > 0) {
os.write(b, 0, length);
}

// 这里主要关闭。
os.close();

inputStream.close();
return null;
}

未命名

发表于 2018-02-09

title: Git常用命令
date: 2016-07-09 16:07:10
tags: GitHub

categories: GitHub

创建版本库

1.pwd 显示当前目录
2.git init 把当前目录变成git可以管理的仓库

配置 Git

  • $ git config --global user.name "John Doe"
  • $ git config --global user.email johndoe@example.com

    提交文件到仓库

    1.git add 文件名.后缀
    2.git commit -m “描述文字 注释”
    3.git status 查看文件是否提交
    4.git diff file 查看文件对比
    5.git log 查看git提交日志,git log --pretty=oneline 简化输出

    版本回退和撤消

1.git reset --hard HEAD^ 回退上一个版本
2.git reset --hard HEAD^^回退上上一个版本
3.git reset --hard HEAD~100 回退前100个版本
4.git reflog 获取版本号
5.git reset --hard 版本号 恢复这个版本
6.git checkout -- file 丢弃工作区的修改
7.git reset HEAD file 可以把暂存区的修改撤销掉,重新放回工作区

理解工作区与暂存区的区别?

1.工作区:就是你在电脑上看到的目录,比如目录下testgit里的文件(.git隐藏目录 版本库除外)。或者以后需要再新建的目录文件等等都属于工作区范畴。
2.版本库(Repository):工作区有一个隐藏目录.git,这个不属于工作区,这是版本 库。其中版本库里面存了很多东西,其中最重要的就是stage(暂存区),还有Git为我 们自动创建了第一个分支master,以及指向master的一个指针HEAD。

git add 就是把文件从工作区修改添加到暂存区;

远程仓库 SSH Keys

1.ssh-keygen -t rsa -C "503610326@qq.com" 用户目录会多一个.ssh目 录。id_rsa是私钥,不能泄露出去,id_rsa.pub是公钥,可以放心地告诉任何人。
2.登录github,打开” settings”中的SSH Keys页面,然后点击“Add SSH Key”, 填上任意title,在Key文本框里黏贴id_rsa.pub文件的内容。

关联和提交文件到远程仓库

1.登录github,创建一个与本地同名的仓库
2.在本地仓库运行命令git remote add origin http://...远程仓库的地址
3.本地库的内容推送到远程,使用 git push命令,实际上是把当前分支master推送 到远程。
4.git push -u origin master 第一次要加-u 然后输入用户名,密码
5.git push origin master 以后每一次提交到服务器
6.git remote -v查看远程库信息

如何从远程库克隆

1.在github上创建一个仓库
2.本地 git clone https://...仓库名 本地就会生成目录了

管理分支

1.git checkout -b dev 创建并切换分支 也可以分两步:git branch dev+git checkout dev
2.git branch 查看当前分支
3.git merge dev 合并分支 指定分支合并到当前分支
4.git branch -d name 删除分支
5.git merge --no-ff -m "描述" dev 用普通模式合并,合并后的历史有分支,能看出来曾经做过合并。
6.git stash 隐藏分支
7.git stash list 查看隐藏分支
8.git stash apply 恢复隐藏分支 但不会删除 git stash drop 删除隐藏分支
9.git stash pop 恢复隐藏分支并且删除
10.git branch -D <name> 删除没有合并的分支
11.git push origin branch-name 把本地分支推送到远程仓库
12.推送失败,git pull origin branch-name拉去远程分支与本地合并,解决分支,继续提交
13.git checkout -b dev origin/dev 在本地创建和远程分支对应的分支

分支管理策略

1.git merge -no-ff -m "注释" dev 合并dev分支 保留dev分支信息(删除该分 区信息还可以查看到)
2.分支策略:首先master主分支应该是非常稳定的,也就是用来发布新版本,一般情况下不允许在上面干活,干活一般情况下在新建的dev分支上干活,干完后,比如上要发 布,或者说dev分支代码稳定后可以合并到主分支master上来。

Bug分支

1.每个bug都可以通过一个临时分支来修复,修复完成后,合并分支,然后将临时的分 支删除掉。
2.git stash 将当前的工作现场隐藏起来 等Bug分区修复好BUG。
3.git stash list查看
4.git stash apply恢复git stash drop 删除stash内容
5.git stash pop回复并删除stash内容

多人协作

1.当你从远程库克隆时候,实际上Git自动把本地的master分支和远程的master分支 对应起来了,并且远程库的默认名称是origin。
2.git remote 查看远程库的信息 -v 查看详细信息
3.git push origin master 推送到远程的分支上去
4.一般是主分支推送到远程的

数据库事务中的隔离级别

发表于 2018-01-21 | 分类于 数据库

来自:

数据库事务中的隔离级别和锁+spring Transactional注解

数据库事务中的隔离级别和锁

数据库事务在后端开发中占非常重要的地位,如何确保数据读取的正确性、安全性也是我们需要研究的问题。
ACID
首先总结一下数据库事务正确执行的四个要素(ACID):

原子性(Atomicity):即事务是不可分割的最小工作单元,事务内的操作要么全做,要么全不做,不能只做一部分;
一致性(Consistency):在事务执行前数据库的数据处于正确的状态,而事务执行完成后数据库的数据还是处于正确的状态,即数据完整性约束没有被破坏;比如我们做银行转账的相关业务,A转账给B,要求A转的钱B一定要收到。如果A转了钱而B没有收到,那么数据库数据的一致性就得不到保障,在做高并发业务时要注意合理的设计。
隔离性(Isolation):并发事务执行之间无影响,在一个事务内部的操作对其他事务是不产生影响,这需要事务隔离级别来指定隔离性;
持久性(Durability):事务一旦执行成功,它对数据库的数据的改变必须是永久的,不会因各种异常导致数据不一致或丢失。
事务隔离级别
大部分数据库事务操作都是并发执行的,这就可能遇到下面的几种问题:

丢失更新:两个事务同时更新一行数据,最后一个事务的更新会覆盖掉第一个事务的更新,从而导致第一个事务更新的数据丢失,后果比较严重。一般是由于没加锁的原因造成的。
脏读(Dirty reads):一个事务A读取到了另一个事务B还没有提交的数据,并在此基础上进行操作。如果B事务rollback,那么A事务所读取到的数据就是不正确的,会带来问题。
不可重复读(Non-repeatable reads):在同一事务范围内读取两次相同的数据,所返回的结果不同。比如事务B第一次读数据后,事务A更新数据并commit,那么事务B第二次读取的数据就与第一次是不一样的。
幻读(Phantom reads):一个事务A读取到了另一个事务B新提交的数据。比如,事务A对一个表中所有行的数据按照某规则进行修改(整表操作),同时,事务B向表中插入了一行原始数据,那么后面事务A再对表进行操作时,会发现表中居然还有一行数据没有被修改,就像发生了幻觉,飘飘欲仙一样。
注意:不可重复读和幻读的区别是,不可重复读对应的表的操作是更改(UPDATE),而幻读对应的表的操作是插入(INSERT),两种的应对策略不一样。对于不可重复读,只需要采用行级锁防止该记录被更新即可,而对于幻读必须加个表级锁,防止在表中插入数据。有关锁的问题,下面会讨论。

为了处理这几种问题,SQL定义了下面的4个等级的事务隔离级别:

未提交读(READ UNCOMMITTED ):最低隔离级别,一个事务能读取到别的事务未提交的更新数据,很不安全,可能出现丢失更新、脏读、不可重复读、幻读;
提交读(READ COMMITTED):一个事务能读取到别的事务提交的更新数据,不能看到未提交的更新数据,不会出现丢失更新、脏读,但可能出现不可重复读、幻读;
可重复读(REPEATABLE READ):保证同一事务中先后执行的多次查询将返回同一结果,不受其他事务影响,不可能出现丢失更新、脏读、不可重复读,但可能出现幻读;
序列化(SERIALIZABLE):最高隔离级别,不允许事务并发执行,而必须串行化执行,最安全,不可能出现更新、脏读、不可重复读、幻读,但是效率最低。
隔离级别越高,数据库事务并发执行性能越差,能处理的操作越少。所以一般地,推荐使用REPEATABLE READ级别保证数据的读一致性。对于幻读的问题,可以通过加锁来防止。
MySQL支持这四种事务等级,默认事务隔离级别是REPEATABLE READ。Oracle数据库支持READ COMMITTED 和 SERIALIZABLE这两种事务隔离级别,所以Oracle数据库不支持脏读。Oracle数据库默认的事务隔离级别是READ COMMITTED。

各种锁
下面总结一下MySQL中的锁,有好几种分类。其它RDBMS也差不多是这样。
首先最重要的分类就是乐观锁(Optimistic Lock)和悲观锁(Pessimistic Lock),这实际上是两种锁策略。
乐观锁,顾名思义就是非常乐观,非常相信真善美,每次去读数据都认为其它事务没有在写数据,所以就不上锁,快乐的读取数据,而只在提交数据的时候判断其它事务是否搞过这个数据了,如果搞过就rollback。乐观锁相当于一种检测冲突的手段,可通过为记录添加版本或添加时间戳来实现。
悲观锁,对其它事务抱有保守的态度,每次去读数据都认为其它事务想要作祟,所以每次读数据的时候都会上锁,直到取出数据。悲观锁大多数情况下依靠数据库的锁机制实现,以保证操作最大程度的独占性,但随之而来的是各种开销。悲观锁相当于一种避免冲突的手段。
选择标准:如果并发量不大,或数据冲突的后果不严重,则可以使用乐观锁;而如果并发量大或数据冲突后果比较严重(对用户不友好),那么就使用悲观锁。

从读写角度,分共享锁(S锁,Shared Lock)和排他锁(X锁,Exclusive Lock),也叫读锁(Read Lock)和写锁(Write Lock)。
理解:

持有S锁的事务只读不可写。如果事务A对数据D加上S锁后,其它事务只能对D加上S锁而不能加X锁。
持有X锁的事务可读可写。如果事务A对数据D加上X锁后,其它事务不能再对D加锁,直到A对D的锁解除。
从锁的粒度角度,主要分为表级锁(Table Lock)和行级锁(Row Lock)。
表级锁将整个表加锁,性能开销最小。用户可以同时进行读操作。当一个用户对表进行写操作时,用户可以获得一个写锁,写锁禁止其他的用户读写操作。写锁比读锁的优先级更高,即使有读操作已排在队列中,一个被申请的写锁仍可以排在所队列的前列。
行级锁仅对指定的记录进行加锁,这样其它进程可以对同一个表中的其它记录进行读写操作。行级锁粒度最小,开销大,能够支持高并发,可能会出现死锁。

MySQL的MyISAM引擎使用表级锁,而InnoDB支持表级锁和行级锁,默认是行级锁。
还有BDB引擎使用页级锁,即一次锁定一组记录,并发性介于行级锁和表级锁之间。

三级锁协议
三级加锁协议是为了保证正确的事务并发操作,事务在读、写数据库对象是需要遵循的加锁规则。

一级封锁协议:事务T在修改数据R之前必须对它加X锁,直到事务结束方可释放。而若事务T只是读数据,不进行修改,则不需加锁,因此一级加锁协议下可能会出现脏读和不可重复读。
二级加锁协议:在一级加锁协议的基础上,加上这样一条规则——事务T在读取数据R之前必须对它加S锁,直到读取完毕以后释放。二级加锁协议下可能会出现不可重复读。
三级加锁协议:在一级加锁协议的基础上,加上这样一条规则——事务T在读取数据R之前必须对它加S锁,直到事务结束方可释放。三级加锁协议避免了脏读和不可重复读的问题。

spring @Transactional注解参数详解

事物注解方式: @Transactional

当标于类前时, 标示类中所有方法都进行事物处理 , 例子:

1 @Transactional public class TestServiceBean implements TestService {}
当类中某些方法不需要事物时:

1
2
3
4
5
6
7
8
9
10
11
@Transactional 
public class TestServiceBean implements TestService {
private TestDao dao;
public void setDao(TestDao dao) {
this.dao = dao;
}
@Transactional(propagation =Propagation.NOT_SUPPORTED)
public List getAll() {
return null;
}
}

事物传播行为介绍:

1
2
3
4
5
6
7
8
9
10
11
12
@Transactional(propagation=Propagation.REQUIRED) ;
//如果有事务, 那么加入事务, 没有的话新建一个(默认情况下)
@Transactional(propagation=Propagation.NOT_SUPPORTED) ;
//容器不为这个方法开启事务
@Transactional(propagation=Propagation.REQUIRES_NEW) ;
//不管是否存在事务,都创建一个新的事务,原来的挂起,新的执行完毕,继续执行老的事务
@Transactional(propagation=Propagation.MANDATORY) ;
//必须在一个已有的事务中执行,否则抛出异常
@Transactional(propagation=Propagation.NEVER) ;
//必须在一个没有的事务中执行,否则抛出异常(与Propagation.MANDATORY相反)
@Transactional(propagation=Propagation.SUPPORTS) ;
//如果其他bean调用这个方法,在其他bean中声明事务,那就用事务.如果其他bean没有声明事务,那就不用事务.

事物超时设置:

@Transactional(timeout=30) //默认是30秒

事务隔离级别:

  @Transactional(isolation = Isolation.READ_UNCOMMITTED):读取未提交数据(会出现脏读, 不可重复读) 基本不使用
  @Transactional(isolation = Isolation.READ_COMMITTED):读取已提交数据(会出现不可重复读和幻读)
  @Transactional(isolation = Isolation.REPEATABLE_READ):可重复读(会出现幻读)
  @Transactional(isolation = Isolation.SERIALIZABLE):串行化

  MYSQL: 默认为REPEATABLE_READ级别
  SQLSERVER: 默认为READ_COMMITTED

脏读 : 一个事务读取到另一事务未提交的更新数据
不可重复读 : 在同一事务中, 多次读取同一数据返回的结果有所不同, 换句话说,
后续读取可以读到另一事务已提交的更新数据. 相反, “可重复读”在同一事务中多次
读取数据时, 能够保证所读数据一样, 也就是后续读取不能读到另一事务已提交的更新数据
幻读 : 一个事务读到另一个事务已提交的insert数据

@Transactional注解中常用参数说明

参数名称

功能描述

readOnly

该属性用于设置当前事务是否为只读事务,设置为true表示只读,false则表示可读写,默认值为false。例如:@Transactional(readOnly=true)

rollbackFor

该属性用于设置需要进行回滚的异常类数组,当方法中抛出指定异常数组中的异常时,则进行事务回滚。例如:

指定单一异常类:@Transactional(rollbackFor=
RuntimeException.class)

指定多个异常类:@Transactional(rollbackFor={RuntimeException.class, Exception.class})

rollbackForClassName

该属性用于设置需要进行回滚的异常类名称数组,当方法中抛出指定异常名称数组中的异常时,则进行事务回滚。例如:

指定单一异常类名称:@Transactional(rollbackForClassName=
“RuntimeException”)

指定多个异常类名称:@Transactional(rollbackForClassName={“RuntimeException”,”Exception”})

noRollbackFor

该属性用于设置不需要进行回滚的异常类数组,当方法中抛出指定异常数组中的异常时,不进行事务回滚。例如:

指定单一异常类:@Transactional(noRollbackFor=
RuntimeException.class)

指定多个异常类:@Transactional(noRollbackFor={RuntimeException.class, Exception.class})

noRollbackForClassName

该属性用于设置不需要进行回滚的异常类名称数组,当方法中抛出指定异常名称数组中的异常时,不进行事务回滚。例如:

指定单一异常类名称:@Transactional(noRollbackForClassName=
“RuntimeException”)

指定多个异常类名称:

@Transactional(noRollbackForClassName={“RuntimeException”,”Exception”})

propagation

该属性用于设置事务的传播行为,具体取值可参考表6-7。

例如:
@Transactional(propagation=
Propagation.NOT_SUPPORTED,readOnly=true)

isolation

该属性用于设置底层数据库的事务隔离级别,事务隔离级别用于处理多事务并发的情况,通常使用数据库的默认隔离级别即可,基本不需要进行设置

timeout

该属性用于设置事务的超时秒数,默认值为-1表示永不超时

注意的几点:
  1、@Transactional 只能被应用到public方法上, 对于其它非public的方法,如果标记了@Transactional也不会报错,但方法没有事务功能.
  2、用 spring 事务管理器,由spring来负责数据库的打开,提交,回滚.默认遇到运行期例外(throw new RuntimeException(“注释”);)会回滚,即遇到不受检查(unchecked)的例外时回滚;而遇到需要捕获的例外(throw new Exception(“注释”);)不会回滚,即遇到受检查的例外(就是非运行时抛出的异常,编译器会检查到的异常叫受检查例外或说受检查异常)时,需我们指定方式来让事务回滚要想所有异常都回滚,要加上 @Transactional( rollbackFor={Exception.class,其它异常}) .如果让unchecked例外不回滚:
@Transactional(notRollbackFor=
RunTimeException.class)
如下:

1
2
3
4
5
6
7
8
@Transactional(rollbackFor=Exception.class) //指定回滚,遇到异常Exception时回滚
public void methodName() {
   throw new Exception("注释");
}
@Transactional(noRollbackFor=Exception.class)//指定不回滚,遇到运行期例外(throw new RuntimeException("注释");)会回滚
public ItimDaoImpl getItemDaoImpl() {
   throw new RuntimeException("注释");
}

3、@Transactional 注解应该只被应用到 public 可见度的方法上。 如果你在 protected、private 或者 package-visible 的方法上使用 @Transactional 注解,它也不会报错, 但是这个被注解的方法将不会展示已配置的事务设置。
  4、@Transactional 注解可以被应用于接口定义和接口方法、类定义和类的 public 方法上。然而,请注意仅仅 @Transactional 注解的出现不足于开启事务行为,它仅仅 是一种元数据,能够被可以识别 @Transactional 注解和上述的配置适当的具有事务行为的beans所使用。上面的例子中,其实正是 元素的出现 开启 了事务行为。
  5、Spring团队的建议是你在具体的类(或类的方法)上使用 @Transactional 注解,而不要使用在类所要实现的任何接口上。你当然可以在接口上使用 @Transactional 注解,但是这将只能当你设置了基于接口的代理时它才生效。因为注解是不能继承的,这就意味着如果你正在使用基于类的代理时,那么事务的设置将不能被基于类的代理所识别,而且对象也将不会被事务代理所包装(将被确认为严重的)。因此,请接受Spring团队的建议并且在具体的类上使用 @Transactional 注解。

centOS 7

发表于 2018-01-19 | 分类于 Linux

FTP的搭建和使用
https://help.aliyun.com/knowledge_detail/60152.html
centos7通过yum安装JDK1.8

安装之前先检查一下系统有没有自带open-jdk
命令:
rpm -qa |grep java
rpm -qa |grep jdk
rpm -qa |grep gcj

如果没有输入信息表示没有安装。
如果安装可以使用rpm -qa | grep java | xargs rpm -e –nodeps 批量卸载所有带有Java的文件 这句命令的关键字是java
首先检索包含java的列表

yum list java*

检索1.8的列表

yum list java-1.8*

安装1.8.0的所有文件

yum install java-1.8.0-openjdk* -y

使用命令检查是否安装成功

java -version

CentOS7安装ActiveMQ
1、下载activemq,下载地址:http://archive.apache.org/dist/activemq。测试版本为apache-activemq-5.14.1。

2、在/ursr/local/目录下新建activemq文件夹,并进入该文件夹,执行如下命令解压文件。

1
2
3
cd /ursr/local
mkdir activemq
tar -xzvf apache-activemq-5.14.1-bin.tar.gz

3、在/etc/init.d/目录增加增加activemq文件,文件内容为:

1
2
cd /etc/init.d/
vi activemq

1
2
3
4
5
6
7
8
9
10
11
12
13
14
15
16
17
18
19
20
21
22
23
24
25
26
27
28
29
30
31
#!/bin/sh
#
# /etc/init.d/activemq
# chkconfig: 345 63 37
# description: activemq servlet container.
# processname: activemq 5.14.3

# Source function library.
#. /etc/init.d/functions
# source networking configuration.
#. /etc/sysconfig/network

#export JAVA_HOME=/usr/local/jdk1.8.0_121
export CATALINA_HOME=/usr/local/activemq/apache-activemq-5.14.3

case $1 in

start)
sh $CATALINA_HOME/bin/activemq start
;;
stop)
sh $CATALINA_HOME/bin/activemq stop
;;
restart)
sh $CATALINA_HOME/bin/activemq stop
sleep 1
sh $CATALINA_HOME/bin/activemq start
;;

esac
exit 0

4、对activemq文件授予权限。

hmod 777 activemq
5、设置开机启动并启动activemq

hkconfig activemq on
ervice activemq start

5、访问地址:http://IP地址:8161/。

访问成功,ActiveMQ安装完毕。默认用户名密码为:admin/admin。

6、其他

查看activemq状态
service activemq status
其他和关闭activemq服务

1
2
service activemq start
service activemq stop

设置开机启动或不启动activemq服务

1
2
chkconfig activemq on
chkconfig activemq off

Linux系统下yum命令查看安装了哪些软件包:
$yum list installed //列出所有已安装的软件包
yum针对软件包操作常用命令:
1.使用YUM查找软件包
命令:yum search
2.列出所有可安装的软件包
命令:yum list
3.列出所有可更新的软件包
命令:yum list updates
4.列出所有已安装的软件包
命令:yum list installed
5.列出所有已安装但不在 Yum Repository 内的软件包
命令:yum list extras
6.列出所指定的软件包
命令:yum list
7.使用YUM获取软件包信息
命令:yum info
8.列出所有软件包的信息
命令:yum info
9.列出所有可更新的软件包信息
命令:yum info updates
10.列出所有已安装的软件包信息
命令:yum info installed
11.列出所有已安装但不在 Yum Repository 内的软件包信息
命令:yum info extras
12.列出软件包提供哪些文件
命令:yum provides
如何查看yum安装的软件路径

  1. rpm -qa|grep 软件包名
  2. rpm -ql 软件包名 (l是L的小写,不是坚线)

rpm常用命令
1.安装一个包
rpm -ivh
2.升级一个包
rpm -Uvh
3.移走一个包
rpm -e
4.安装参数
–force 即使覆盖属于其它包的文件也强迫安装
–nodeps 如果该RPM包的安装依赖其它包,即使其它包没装,也强迫安装。
5.查询一个包是否被安装
rpm -q < rpm package name>
6.得到被安装的包的信息
rpm -qi < rpm package name>
7.列出该包中有哪些文件
rpm -ql < rpm package name>
8.列出服务器上的一个文件属于哪一个RPM包
rpm -qf
9.可综合好几个参数一起用
rpm -qil < rpm package name>
10.列出所有被安装的rpm package
rpm -qa
11.列出一个未被安装进系统的RPM包文件中包含有哪些文件?
rpm -qilp < rpm package name>

apt-get常用命令
apt-cache search package 搜索软件包
apt-cache show package 获取包的相关信息,如说明、大小、版本等
sudo apt-get install package 安装包
sudo apt-get install package –reinstall 重新安装包
sudo apt-get -f install 修复安装
sudo apt-get remove package 删除包
sudo apt-get remove package –purge 删除包,包括配置文件等
sudo apt-get update 更新源
sudo apt-get upgrade 更新已安装的包
sudo apt-get dist-upgrade 升级系统
apt-cache depends package 了解使用该包依赖那些包
apt-cache rdepends package 查看该包被哪些包依赖
sudo apt-get build-dep package 安装相关的编译环境
apt-get source package 下载该包的源代码
sudo apt-get clean && sudo apt-get autoclean 清理无用的包
sudo apt-get check 检查是否有损坏的依赖

其他

源码安装
1 ./configure 相关库文人件以及配置参数并生成make file
2 make 对源码进行编译,生成可执行文件
3 make install 将生成的可执行文件安装到当前计算机中
rpm 基础命令
安装软件 : rpm -i software.rpm
卸装软件 : rpm -e software
升级形式安装: rpm -U software-new.rpm
rpm支持通过http,ftp协议安装软件
rpm -lvh http://www.linuxcast.net/software.rpm
可以加入以下参数
-v显示相关信息
-h显示进度条

通常都会加上参数
eg: rpm -ivh software.rpm

使用service 管理

cd /etc/init.d
新建 文件

JAVA注解

发表于 2018-01-15 | 分类于 JAVA

1. 注解的定义

注解通过 @interface 关键字进行定义。

1
2
public @interface TestAnnotation {
}

2. 注解的应用

1
2
3
@TestAnnotation
public class Test {
}

3. 元注解

元注解是可以注解到注解上的注解,或者说元注解是一种基本注解,但是它能够应用到其它的注解上面。
如果难于理解的话,你可以这样理解。元注解也是一张标签,但是它是一张特殊的标签,它的作用和目的就是给其他普通的标签进行解释说明的。
元标签有 @Retention、@Documented、@Target、@Inherited、@Repeatable 5 种

1、@Retention

Retention 的英文意为保留期的意思。当 @Retention 应用到一个注解上的时候,它解释说明了这个注解的的存活时间。

它的取值如下:

  • RetentionPolicy.SOURCE 注解只在源码阶段保留,在编译器进行编译时它将被丢弃忽视。
  • RetentionPolicy.CLASS 注解只被保留到编译进行的时候,它并不会被加载到 JVM 中。
  • RetentionPolicy.RUNTIME 注解可以保留到程序运行的时候,它会被加载进入到 JVM 中,所以在程序运行时可以获取到它们。

我们可以这样的方式来加深理解,@Retention 去给一张标签解释的时候,它指定了这张标签张贴的时间。@Retention 相当于给一张标签上面盖了一张时间戳,时间戳指明了标签张贴的时间周期。

1
2
3
@Retention(RetentionPolicy.RUNTIME)
public @interface TestAnnotation {
}

2、Documented

顾名思义,这个元注解肯定是和文档有关。它的作用是能够将注解中的元素包含到 Javadoc 中去。

3、@Target

Target 是目标的意思,@Target 指定了注解运用的地方。

你可以这样理解,当一个注解被 @Target 注解时,这个注解就被限定了运用的场景。

类比到标签,原本标签是你想张贴到哪个地方就到哪个地方,但是因为 @Target 的存在,它张贴的地方就非常具体了,比如只能张贴到方法上、类上、方法参数上等等。@Target 有下面的取值

  • ElementType.ANNOTATION_TYPE 可以给一个注解进行注解
  • ElementType.CONSTRUCTOR 可以给构造方法进行注解
  • ElementType.FIELD 可以给属性进行注解
  • ElementType.LOCAL_VARIABLE 可以给局部变量进行注解
  • ElementType.METHOD 可以给方法进行注解
  • ElementType.PACKAGE 可以给一个包进行注解
  • ElementType.PARAMETER 可以给一个方法内的参数进行注解
  • ElementType.TYPE 可以给一个类型进行注解,比如类、接口、枚举

4、@Inherited

被@Inherited注解过的类,子类继承它,同时子类也拥有该注解

5、@Repeatable

Repeatable 自然是可重复的意思。@Repeatable 是 Java 1.8 才加进来的,所以算是一个新的特性。

什么样的注解会多次应用呢?通常是注解的值可以同时取多个。

举个例子,一个人他既是程序员又是产品经理,同时他还是个画家。

1
2
3
4
5
6
7
8
9
10
11
12
13
14
15
@interface Persons {
Person[] value();
}

@Repeatable(Persons.class)
@interface Person{
String role default "";
}

@Person(role="artist")
@Person(role="coder")
@Person(role="PM")
public class SuperMan{

}

4. 注解的属性

1
2
3
4
5
6
7
8
9
10
@Target(ElementType.TYPE)
@Retention(RetentionPolicy.RUNTIME)
public @interface TestAnnotation {

int id();

String msg();

int age() default 18; //默认值
}

使用:

1
2
3
4
@TestAnnotation(id=3,msg="hello annotation")	//age默认值18
public class Test {

}

如果该注解只有value一个属性 那可以直接使用@TestAnnotation(“value”)

5. Java 预置的注解

1、@Deprecated

过时的方法、过时的类、过时的成员变量

2、@SuppressWarnings

忽略@Deprecated这种警告

3、@FunctionalInterface

函数式接口注解,这个是 Java 1.8 版本引入的新特性。函数式编程很火,所以 Java 8 也及时添加了这个特性。

5. 注解与反射。(如何被使用)

1、通过反射获取注解

解通过反射获取。首先可以通过 Class 对象的 isAnnotationPresent() 方法判断它是否应用了某个注解
public boolean isAnnotationPresent(Class<? extends Annotation> annotationClass) {}

然后通过 getAnnotation() 方法来获取 Annotation 对象。
public <A extends Annotation> A getAnnotation(Class<A> annotationClass) {}

或者是 getAnnotations() 方法。
public Annotation[] getAnnotations() {}

前一种方法返回指定类型的注解,后一种方法返回注解到这个元素上的所有注解。
如果获取到的 Annotation 如果不为 null,则就可以调用它们的属性方法了。比如

1
2
3
4
5
6
7
8
9
10
11
12
13
14
15
16
17
@TestAnnotation()
public class Test {

public static void main(String[] args) {

boolean hasAnnotation = Test.class.isAnnotationPresent(TestAnnotation.class);

if ( hasAnnotation ) {
TestAnnotation testAnnotation = Test.class.getAnnotation(TestAnnotation.class);

System.out.println("id:"+testAnnotation.id());
System.out.println("msg:"+testAnnotation.msg());
}

}

}

2、属性、方法上的注解

1
2
3
4
5
6
7
8
9
10
11
12
13
14
15
16
17
18
19
20
21
22
23
24
25
26
27
28
29
30
31
32
33
34
35
36
37
38
39
40
41
42
43
44
45
46
47
48
49
50
51
52
53
54
55
56
57
58
59
60
61
62
63
64
65
66
67
@TestAnnotation(msg="hello")
public class Test {

@Check(value="hi")
int a;


@Perform
public void testMethod(){}


@SuppressWarnings("deprecation")
public void test1(){
Hero hero = new Hero();
hero.say();
hero.speak();
}


public static void main(String[] args) {

boolean hasAnnotation = Test.class.isAnnotationPresent(TestAnnotation.class);

if ( hasAnnotation ) {
TestAnnotation testAnnotation = Test.class.getAnnotation(TestAnnotation.class);
//获取类的注解
System.out.println("id:"+testAnnotation.id());
System.out.println("msg:"+testAnnotation.msg());
}


try {
Field a = Test.class.getDeclaredField("a");
a.setAccessible(true);
//获取一个成员变量上的注解
Check check = a.getAnnotation(Check.class);

if ( check != null ) {
System.out.println("check value:"+check.value());
}

Method testMethod = Test.class.getDeclaredMethod("testMethod");

if ( testMethod != null ) {
// 获取方法中的注解
Annotation[] ans = testMethod.getAnnotations();
for( int i = 0;i < ans.length;i++) {
System.out.println("method testMethod annotation:"+ans[i].annotationType().getSimpleName());
}
}
} catch (NoSuchFieldException e) {
// TODO Auto-generated catch block
e.printStackTrace();
System.out.println(e.getMessage());
} catch (SecurityException e) {
// TODO Auto-generated catch block
e.printStackTrace();
System.out.println(e.getMessage());
} catch (NoSuchMethodException e) {
// TODO Auto-generated catch block
e.printStackTrace();
System.out.println(e.getMessage());
}

}

}
1234
lightquant

lightquant

你得拼命奔跑,才能留在原地!

36 日志
16 分类
27 标签
GitHub E-Mail
© 2018 lightquant
由 Hexo 强力驱动
|
主题 — NexT.Gemini v6.0.0